Showing posts with label baby. Show all posts

Wednesday, June 15, 2011

Tutorial: Pencil Eraser-Stamped Elephant T-Shirts

elephant baby shower birthday party


My baby's first birthday is just around the corner. We're doing an elephant theme and decided to go with a bold color palette.

If you want to see the elephant and invitations I designed as a starting point, click here.

I recently stumbled upon this technique (done with stamping ink) on Pinterest, and wanted to put my spin on it, but with fabric paints.


For party favors, I  decided to use my elephant and create dotted, stenciled t-shirts.

Here's what I did:

1. cut your stencil from card stock and apply to your t-shirt with double-sided tape.


2. Use a different pencil eraser for each color and stamp away!


3. Make sure you dot around the stencil's edges to create a clear outline of your shape.

baby elephant party favors

This was a FUN project! 

elephant t-shirts kid craft preschool

Oooh, I'm thinking about doing this with my boys' names in different shades of the same color.

And, if I am feeling like a fun mommy, I might just let my 4-year-old take a stab at it.

Stripped down to his undies. Outside. On Newspapers. 

PS: I have a lot more birthday stuff to share so keep checking back.

erin

Shared with: Somewhat Simple, Tatertots and Jello, Be Different Act Normal

Friday, May 27, 2011

Baby Birthday Party-- Planning and Designing an Elephant Theme

DSC_0066.jpg

My little squishy squish squish is turning one in less than a month...

How???

Oh, that clock keeps on ticking, doesn't it?

For his party, I decided on an elephant theme and I'm busy planning away for all the cuteness.

This is the little elephant I designed as a starting point.


Then I moved into a bolder color palette and ended up with this guy:


And then I started working on an invitation.

If you follow on Facebook (and I am so tickled if you do), you know that I recently had a little voting contest on the invitations I'd designed so far. 

I thought that would help me choose, but ACK! The votes were completely divided. Ha!

{By the way, I took my baby's name off. 
Didn't want anyone to think I'd named my little boy BROOKE!}


What do you think? Bold or pastel? Dots or stripes? 
* * * * *

To order your own personalized elephant invites:

Send me an email at in_between_laundry@yahoo.com

For $6, you will receive an emailed jpeg file that you can print out at home on cardstock or photo paper,

or upload to any professional developing lab (like Wal-Mart or Shutterfly).

The elephant logo is $3 and can be used for any decorations, goodie bags, cupcake flags, etc.

Payment is through Pay Pal and your order will be emailed to you within 48 hours of payment received.


Monday, April 25, 2011

Milk Monster Onesie

I hope you all had a super-duper Easter weekend with family and lots of kids running around the yard, looking for brightly painted, chocolate-stuffed eggs.

We did!

Are you ready to swear off candy forever?

We are!

Here's a little project to help you out of that sugar coma.

(I hope I'm not the only one who ate jelly beans all day yesterday!)

fabric paint onesie

This is one of those takes-no-time-but-looks-so-cute kind of projects (my favorite kind).


Feel free to save the image to your computer and print it out to make your own.

If you want to make a t-shirt or onesie like my baby's, simply trace the image and words with fabric paint.

Place cardboard under the picture first so the paint won't bleed through to the other side. Then follow the paint's directions for drying time.

signature

Wednesday, April 20, 2011

Cuddly Easter Bunny Softies

My boys will each get a little baby bunny 
in their Easter baskets on Sunday morning.

No, not real, live rabbits! Are you crazy, girl?!

I have enough mouths to feed and bottoms to clean around here.

But I couldn't resist these simple little bunnies. I found the free pattern here at Wee Wonderfuls.

easter bunny stuffed toy softie


I used soft flannels and miniature buttons for eyes.

The cutting took only a couple of minutes and the stitching took a couple of minutes more. 

You still have time-- whip some up for Easter morning and your kids will have a keepsake to cherish.

Tuesday, April 5, 2011

Stuff I Love: Amanda's Naturals

No. 1: I LOVE handmade items.

No. 2: I LOVE natural products.

No. 3: I LOVE foo-foo smell-ums bath and body stuff.

No. 4: I LOVE making up words like foo-foo smell-ums.


Amanda's Naturals sent me the most wonderful box of goodies and I can't get enough of this high-quality bath, body and home line.

{Whipped Body Butter}
 in Caribbean Dream

You will not believe how lush and silky smooth this is-- a little dab will do ya. In several weeks of use, I've barely made a dent in my can.

It's 100% all-natural and whipped until thick and creamy with grape seed oil, palm oil and olive oil.

The scent is clean and citrusy, very light and fresh.

{R & R Herbal Bath Tea}
with peppermint leaves, lavendar and 
chamomile flowers, oatmeal and essential oils

Genius! You place one bag under hot, running water as the bathtub fills and the bag literally brews.

We all need a little time to ourselves and this is definitely a treat at the end of a long day.

Minty and herbal, this scent is my favorite.

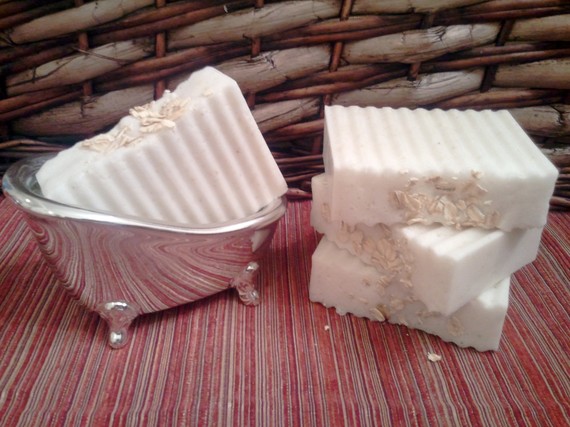
{Oatmeal Soap}
 in Energy


Sign me up for anything that can help out with energy. Mercy me, I need it. I think most moms can relate.

This week, my boys have been battling a stomach bug. Ugh. I'm exhausted and I cannot tell you how many times I've washed my hands.

After switching from an anti-bacterial liquid soap which left my skin itchy-dry, I am pleased to tell you that

this oatmeal soap not only smells wonderful and cleans with a nice, rich lather, but my hands are perfectly smooth and soft--even after many hand-washes.

It's a delightful body wash, too. The scent is orange and ginger, not too feminine or masculine, just natural and pure.

{Aromatherapy Room and Linen Spray}
 in Sleep Time


Can you hear me singing? I saved the best for last...

I am in love with this linen spray.

It smells HEAVENLY, a soft and delicate blend of vanilla and lavender.

But let me show you why it's a miracle-product in my book.


One light spritz in my baby's crib and he actually enjoys getting into bed for nap time. My four-year-old thinks spraying it on his own sheets before bed is extra special, making my life about 58 times easier every night.

I'm pretty willing to bet Amanda would sell this by the case if your kids happen to be anything like mine.

By the way, I use it as a room freshener and in the car, as well.

--Check out Amanda's Natural's--
Use coupon code SPRING for 10% off at check-out.

signature

Thursday, March 17, 2011

Guest Tutorial: Taggie Blankies with "Mom's the Word"

I am thrilled to introduce you to beautiful 
Melissa from Moms The Word


I'm loving these homemade pizzas she whipped up,


Make sure you stop over at Moms The Word and see what else Melissa has been up to.

* * * * * * * * * * * * 

I am so thrilled to be guest hosting at In Between Laundry! Thank you, Erin! 
This is my first time guest blogging. Woop Woop!


Taggy Tag-Alongs

These blankets are a quick and easy project that your kids will love! They can be customized and
make great baby shower gifts!

Supplies:
-1 minkee fat quarter
-Ribbon (I like to get all different textures and colors. Its best if you have about a yard or 1/2 yard of each. The ribbon doesn't even need to match or be color coordinated. You can just use whatever you have laying around. I've even used pieces of rick rack or bias tape.
-matching thread


1. First take your fat quarter and fold it in half the tall way (or hamburger style). Cut on the fold. Hold down your fabric, the minkee tends to shift quite a bit. When you are done you should have two
pieces.

2. Take your two pieces and lay them right sides together. You should be looking at the non-fuzzy side of your fabric.


3. Next, take your ribbon and fold it over your finger. This should give you an idea of how big your loops should be. Go ahead and cut your ribbon. I recommend pulling the wire out of the ribbon that is wired. These blankets get a lot of use and I don't want any babies getting scratched by the wires! You can have all different lengths and textures. My kids have a thing about textures, so I pick
satin, and some fuzzy etc.


(Chipped nails... gotta love em')


4. Once you have it cut, place your ribbon loop on the INSIDE of your fabric. Lay the two pieces together and pin it down. Continue this on all sides.


5. Now it's time to sew! If you're not a super seamstress, dont worry! If you can sew in a semi-straight line, then you can do this! Sew along all sides, leaving 1/4 inch seam. Make sure you leave a 4-inch opening so you can turn it inside-out.


6. Once its sewn all the way around, turn it inside-out. It should look like this one. Cute, right?


7. Fold in the 4-inch opening and pin it down. Now do an outer stitch all the way around ( I always start at the opening). That helps keeps the fabric together and prevents bunching.

Aaaannnddd you're done!! You can do the happy dance now!


This is a pic of my sweet daughter and her taggy. 

 I have to hide them from her when I sew because she can't keep her paws off! 

Come check out Moms The Word to hear about adventures and misadventures of a stay-at-home mom of two. It's always good for a laugh! :)
signature

featured button

Friday, March 11, 2011

Guest Tutorial: "Shutter Pals" with B is for Boy

Through the rest of this month, I'm going to spotlight some amazing ladies and their creative blogs. To start us off, I want to introduce Erica. She and I got to know each other right when I first started In Between Laundry and I've loved keeping up with her boy projects. 

* * * * * * * * * * * * * * *

Hi! I'm Erica
from


I am so happy to be guest posting over here today!
I am a mom with 2 boys, ages 2.5 years & 8 months!  Yes, I have my hands full!

B is for Boy
 is my little creative place. I do a little of this and a little of that.

You'll find sewing & craft tutorials, recipes, and pretty much anything boy!

Here are a few examples of my projects. (Yeah, we're into Thomas the Train over here!)


Today I'm sharing how to make a


Raise your hand if you are tired of pulling your hair out trying to get your child (especially toddlers) to even just look at the camera when you're trying to take their picture!

I've seen these cute things for sale on Etsy like this which is crocheted, or this with a squeaker inside, or this cute monster.  They all are intended to help gain the attention of your child.

Today I am going to show you my DIY version which is very simple, easy, and best of all CHEAP! 

*Please note this is made to fit around a lens of your camera so not all point and shoot cameras will work (I'll try and come up with a different version for you guys later!)

1. First, raid your Goodwill or garage sale box and find an unwanted stuffed animal.  You don't want one too big or too small.  The body should accommodate a camera lens looking through it.  **you might want to do this while your child is not around because they always seem to want that toy back once they see it again!

2. Now, take off anything attached that might be covering the belly area.


3. Grab your seem ripper and start oping up the back seem.  Then take out all the belly stuffing.  Make sure to leave the stuffing in the arms, legs, & head.


4. Find a lens cap or something round that is going to give you the size of your lens.  Trace around it on the tummy of the toy.  I used a fabric marker but it probably doesn't matter since this will be covered up later.


You should have a circle traced on the front.


5. Now pin around that circle through front & back layers making sure to push extra fabric toward the center.  You want the outside edges to be flat.  See the backside, how there is extra fabric in the center.


6. This is where it gets tricky.  You need to sew around that circle you drew.  I'm not going to lie, it's kinda hard.  If you have a walking foot I think it would help but since I just got a new machine my old walking foot doesn't fit my new machine.  

I used black thread because I'm lazy and that's what was already there so you can easily see where I sewed!

7. Now we are going to cut out the material inside the circle.  Use sharp scissors!  Make a little snip through both layers then just cut around the circumference of the circle.  

**At this point try slipping it over your lens and make sure it isn't too tight.  Make your circle larger if you need to.


8. This part is optional.  If you find that the head of your toy is a little floppy try inserting something stiff like a straw because you don't want that head covering your lens! 


9. For the next step you need either Fold Over Elastic (FOE) or a stretchy headband type thing... see picture:

10. Ok, now plug in your glue gun.  Take your FOE (Fold Over Elastic) or hair band and start gluing it to one side.  Once you get around the whole circle then flip it over and glue it to the other side.  

**I did not stretch the elastic very much since the opening is already pretty snug around the lens. 


That's all there is to making a cute little Shutter Pal!  Hopefully, you'll have better luck now getting those adorable smiles out of your little ones!

post signature

featured button