{Our Entryway}
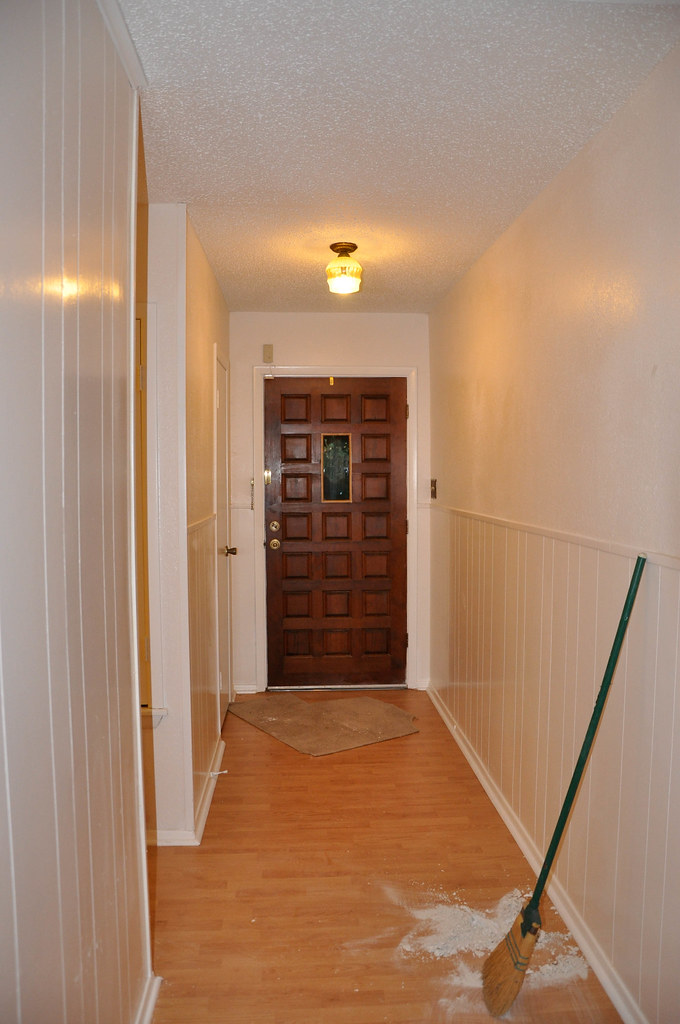
Before:
When we bought our home in September, we knew we had a LOT of work ahead of us.
And we're slowly making some progress, taking it one room at a time.
(More like: we'll do a little in here, then a little in there, and maybe one day we'll have this house done!)
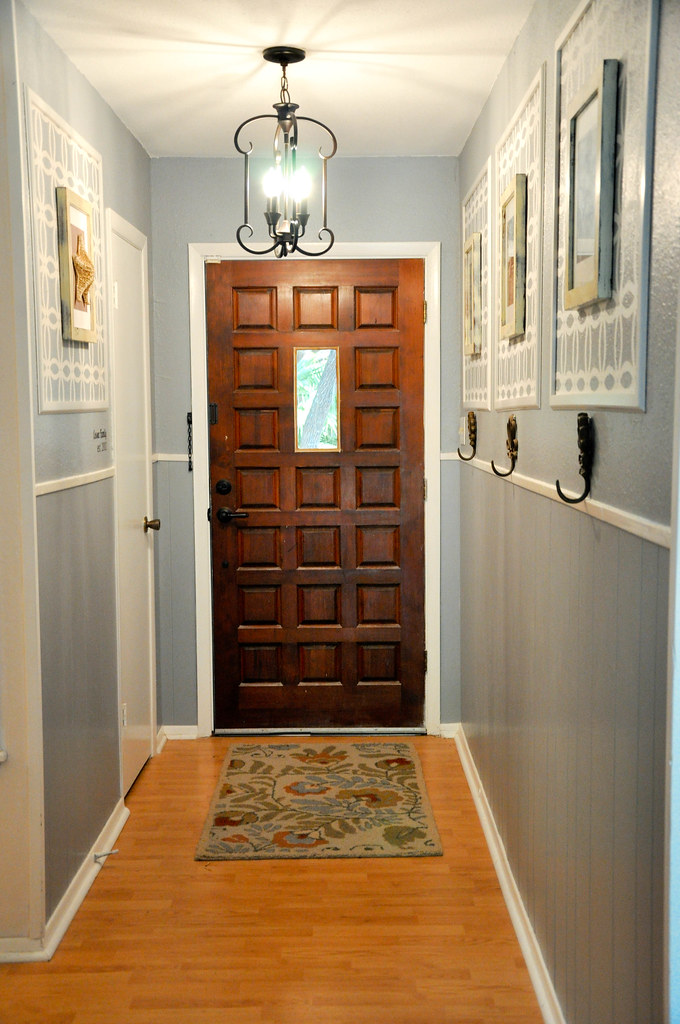
Since I recently posted about our front door makeover (you can read about that here), I wanted to show you the other side of that door...
our very narrow and blah, blah, bland entryway.
The very first thing we did (and by "we" I mean Jeremy) was scrape the popcorn ceilings (you can read all about that messy mess here and see a bit of the dust pile in that top photo).
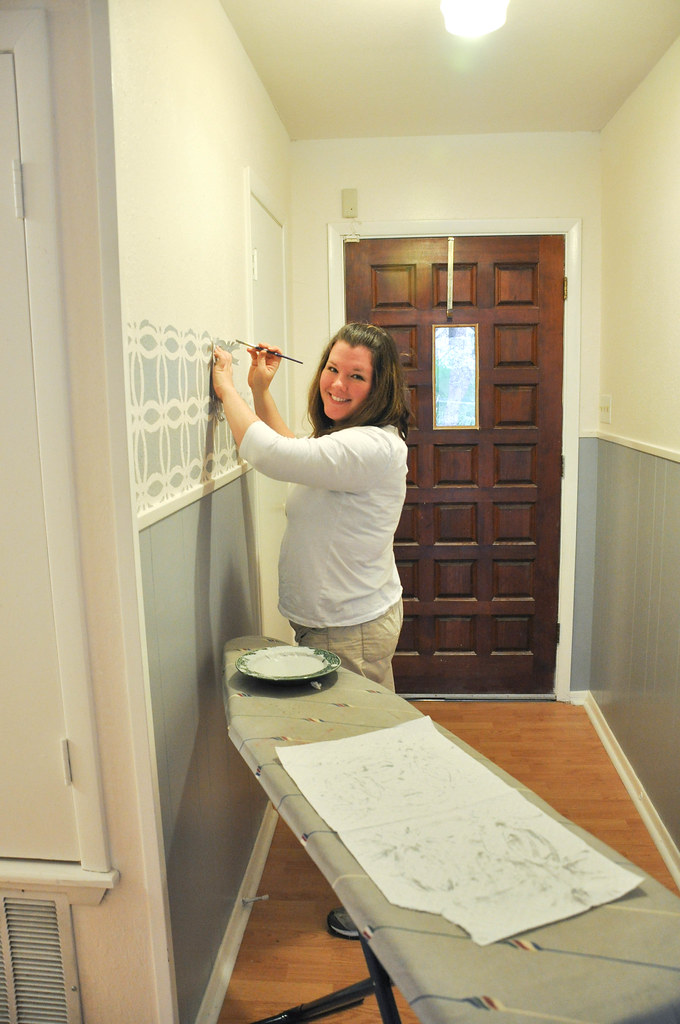
Then I got to work.
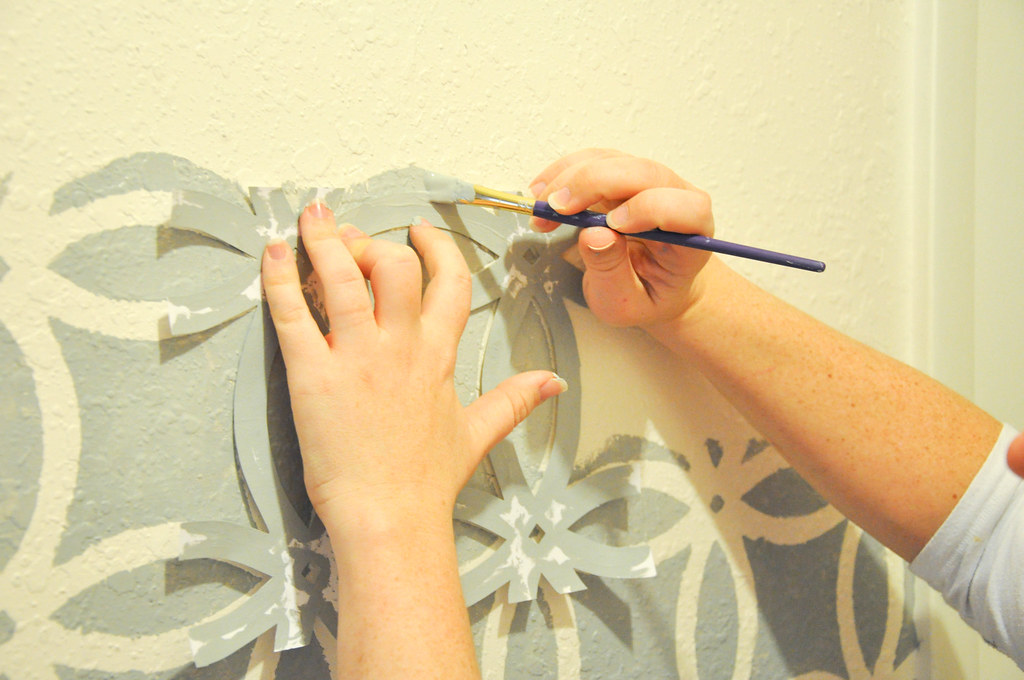
I created my own stencil with my Silhouette machine and cardstock but you could easily find a pattern you like and cut it with an exacto knife. My stencil was definitely not a complicated design.
Okay. So there is PLENTY of DIY stenciling advice out there, but here's what worked for me and I'm pretty sure I tried just about everything else:
My main method:
1. I used a small paintbrush with lots of paint on it.
2. I held the stencil in place with one hand while I painted the outline of the stencil with the other hand.
3. Then I removed the stencil to paper towels and blotted it.
4. Next I filled in my lines I had outlined.
Another method I liked:
I used the same small paintbrush with very little paint on it and stippled the stencil on the wall. In other words, I didn't paint and fill in lines. This technique was a lot faster, but the lines weren't as clean. It worked very well for the small dots that needed to be filled.
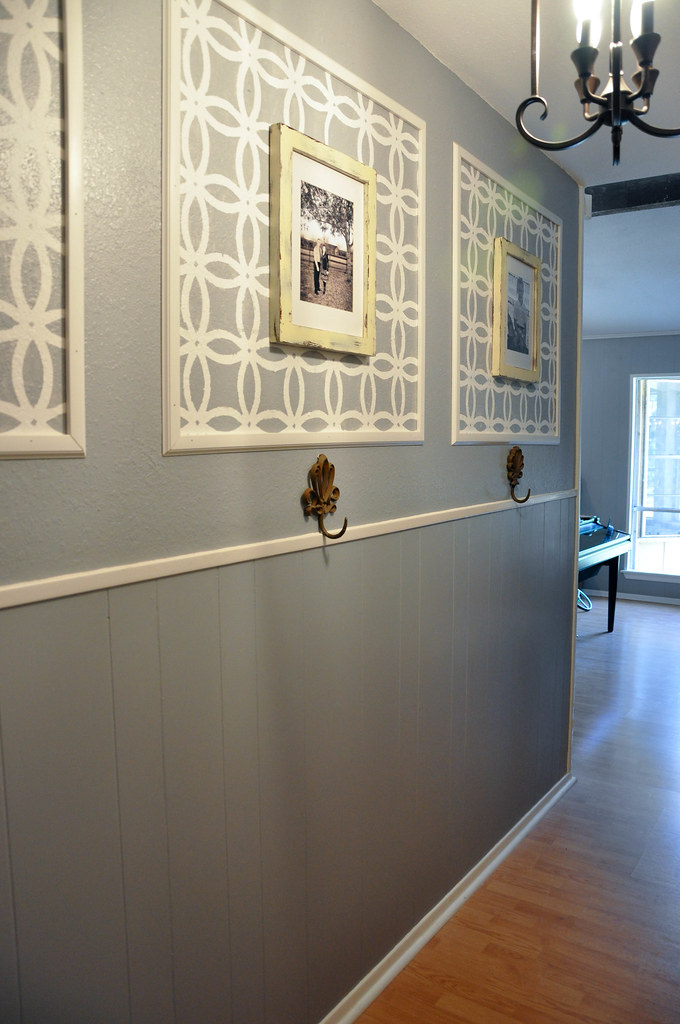
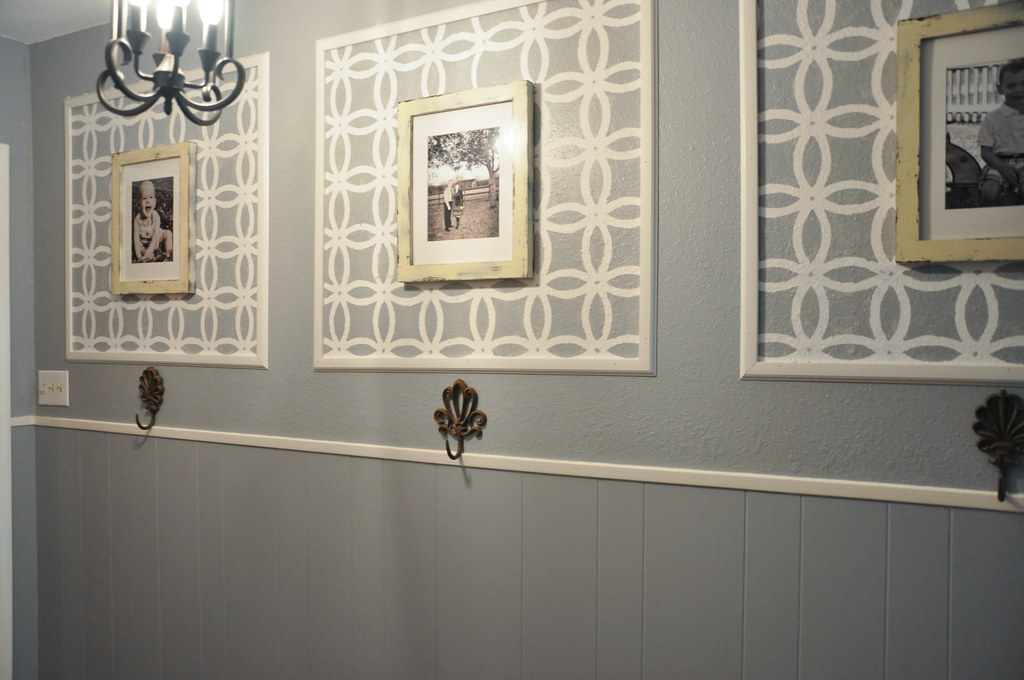
So... I changed my design horse mid-stream and opted for frames with stenciling inside, instead of stenciling the entire wall.
I'm so glad I did! It was a lot faster and adds more visual interest.
Jer and I measured the squares that I had envisioned in my mind's eye and I did all the painting and stenciling (he did help with the top and corners).
Then Jeremy used molding to frame out the edges.
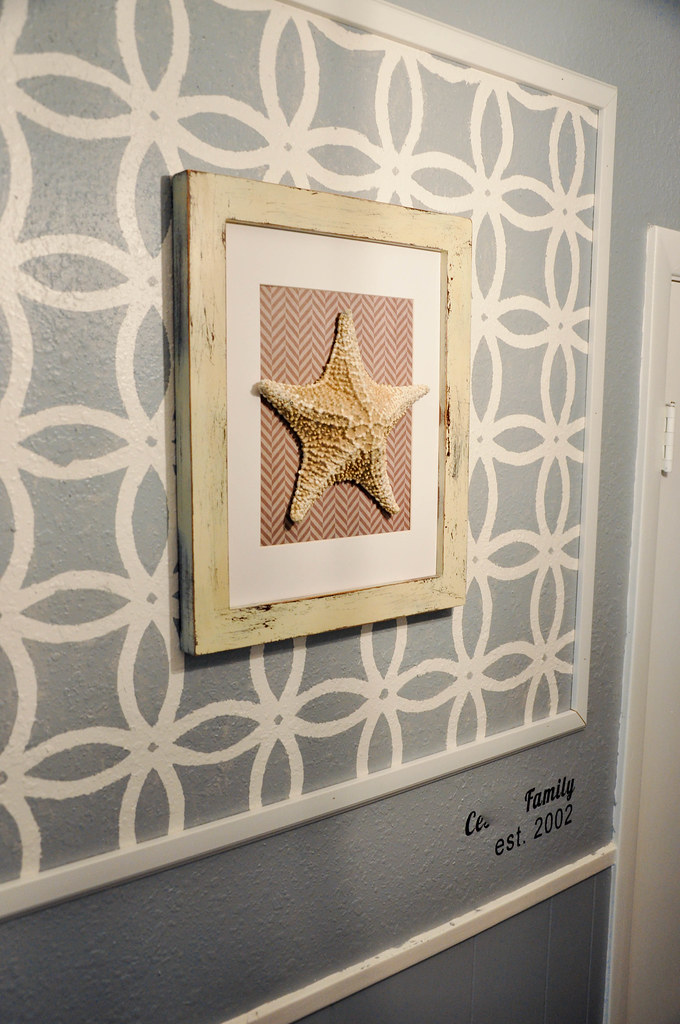
I created some simple, custom art using spray painted Wal-Mart frames that I scraped with steel wool.
I also added our family name in brown vinyl to make it a little more personal and finished the space off with a new lighting fixture and rug.
Before
After
The paint I used was Valspar "Metropolis."

Linked to: Take a Look Tuesday, Today's Creative Blog, Tatertots and Jello, The Creative Crate, The CSI Project


That looks awesome!!! I love that you changed it up and decided to go with just the framed out pieces it really works with the large amount of space that you have! Way to go, girl!! :)
ReplyDeleteThe end result is beautiful! My husband and I are closing on our first house in 9 days--this is perfect inspiration :) Well done, now you can sit back and simply enjoy!
ReplyDeleteI really like how you framed the stenciled areas. And I love the color, so thanks for sharing the name. I been thinking of something like that color for the master bedroom...if I ever get to it. :)
ReplyDeleteWow! This looks great! Awesome idea :)
ReplyDeleteWow! I love it! I can't wait to try it.
ReplyDeleteI love it, Erin! What a beautiful entry!
ReplyDeleteAnd that light fixture is really pretty!
ReplyDeleteI am in awe! That looks so flipping fantastic. Wow!
ReplyDeleteoh, it's gorgeous!! what a huge change! you are so talented.
ReplyDeleteWhat an amazing transformation...looks beautiful, great job!
ReplyDeleteWOW! It looks totally different. I love it. Where did you get the rug it really seems to bring out the color of the wall, but add in a few colors too?
ReplyDeleteErin, you are so creative and talented! It looks just beautiful. Tranqil and soothing.
ReplyDeleteTHIS LOOKS AMAZING! Your hard work paid off!!
ReplyDeleteBeautiful and I love it!
ReplyDeleteGoregeous! Great job. Love the look.
ReplyDeleteSo beautiful! It's incredible!
ReplyDeleteK, this is an AWESOME idea!! I'll be sending my readers your way!! Thanks for the fabulous tutorial!
ReplyDeletelooks amazing!!
ReplyDeleteI love this! Thank you for including the paint name, that was going to be my question!
ReplyDeleteVisiting from Ucreate. I love this! I want to do it in my guest bathroom like right now. Thanks for the inspiration! I am bookmarking this page for sure :)
ReplyDeleteGorgeous, Erin! I love everything about it! That light fixture you put up is absolutely breathtaking!
ReplyDeleteThis is fabulous, completely inviting and I like the complementary rug to go with it.
ReplyDeleteGorgeous, gorgeous! Way to go. I love the framed stencils...so unique.
ReplyDeleteBeautiful! I love the boxed in look of the pictures. Such a delightful change! And the hooks by each picture are really quite handy!
ReplyDeleteWow, Erin, you did a fabulous job! What a beautiful entryway...so elegant!!
ReplyDeleteBeautiful!!! Makes such a difference!
ReplyDeleteyou're amazing :)
ReplyDeleteJackie
http://jaclyndesigns.blogspot.com/
Absolutely adorable! I love the frames - such a great idea.
ReplyDeleteHi there, I just found your blog and I am in love with this project. Your hallway looks amazing, I just can't stand it how creative you are!
ReplyDeleteCan't wait to check out some of your old posts! New follower now!
Megan
http://1funkywoman.blogspot.com
Wow! That turned out beautifully! You go!!
ReplyDeleteLove the stencil that you used! What a transformation!
ReplyDeletethat looks flippin' amazing! what a great idea with the 3 frame look, tho the whole hallway would look great, too. such a fun change to this space! i must try a stencil at some point...
ReplyDeleteLooks beautiful!!! I love the stencil and the frames. I think that making your own stencil is a total rock star idea.
ReplyDeleteLooks beautiful. I have an entryway that would be perfect for this type of thing.
ReplyDeleteOh my, this is unbelievable beautiful. The color is just perfect and I love the hangers. It looks elegant and expensive!!!!
ReplyDeleteWOW! Amazing transformation I'm sure the stencils are time consuming but well worth it!
ReplyDeleteWhat a gorgeous entry way! I love the idea of framed stenciling on the walls. Very creative!
ReplyDeleteThis is crazy-awesome! Where on earth do you get the patience to meticulously do all that stenciling!?
ReplyDeleteIt's definitely worth it when it's done though! :-)
Great job!
I found you on Tatertots and Jello - I was lucky to be featured there today, too! :-)
Nice to meet you - and look forward to getting to know you and your blog more! :-)
~Bec @ littlelucylu
Oh my gosh Erin this is amazing! I LOVE the framed stenciling!!! I have an entryway that is in need to a makeover...I'm thinking this might be it! How many stencils did you go through?
ReplyDeleteAwesome before and after, I need to do that in my own home. Thanks
ReplyDeleteAlright, this is seriously GORGEOUS!!! I just pinned and stumbled this post. Thx for the inspiration!
ReplyDeleteI just featured you on my blog today. Thanks for the inspiration!
ReplyDeletehttp://oopsey-daisy.blogspot.com/2011/05/wednesdays-wowzers-arrives-early.html
Looks awesome! And I cannot believe you did that tedious stenciling! Love the color!
ReplyDeleteJen
Scissors & Spatulas
Love it!! I love the pictures and color of course, but I really like the hooks too!!
ReplyDeletegreat job!
Gorgeous!! Love the color and the stenciling. And, loving that light fixture, too!
ReplyDeleteLove the color! Love the stenciling.
ReplyDeleteElaine
Gorgeous, you have such patience for stenciling! Love the entire space, from colors to stencils to framed objects & pics!
ReplyDelete-caroline @ c.w.frosting
That looks amazing! I love the stencil that you used and I love the squares!
ReplyDeleteI LOVE your entryway! It's beautiful! Where did you find your light...it's just what I've been looking for!?!?!?!?
ReplyDeleteOh my goodness...that is amazing! Where did you come up with that idea? to just stencil the wall into a frame? it's amazing...truly amazing.
ReplyDeletecame from CSI - LOVE. pinning for later ;)
ReplyDeleteI'm visiting from Ucreate. Absolutely love this idea!! I can't wait to try something similar in our new home.
ReplyDeleteOh, I'm loving this. I want to paint my entrance this color as well. I posted about it but haven't yet started the project. I'm here from tip junkie and I'm also your new follower. I invite you to check out my blog too:)
ReplyDeleteThis is beautiful! I love that you only did within the frames- so much more unique! :) Just stopping from from Sew Dang Cute.
ReplyDeleteLove, love, love it! And I just found my new color for our new house :) Bookmarking to come back to your site! This really turned out gorgeous!
ReplyDeleteBlessings,
Mel
Please feel free to stop by: Trailing After God
I love love love it!!! So cute! Someday i will own a house and i might just have to copy you! Great Job! Good luck with Crafting with the Stars!
ReplyDelete